

Quilting Motif - Ribbon Candy
- Tara Wright
- Feb 28, 2023
- 3 min read
Updated: Jan 27
It's time for another fun quilting design! If you like to quilt your own projects or are interested in learning quilting techniques, you've come to the right place. Today we are going to learn a free motion design that creates fabulous texture in any linear area or as a filler for shapes. It might look familiar to you - it's RIBBON CANDY.

I really like this quilting design, but I don't often quilt linear spaces. Maybe I will have to change that!
Ribbon Candy is similar to the Wishbones motif in that it is a similar looping motion with top and bottom loops before you repeat. However, with ribbon candy you don't cross the lines to make the loops instead the lines just barely kiss. It's kind of like drawing balloons or a weird figure 8.


This is a design that uses your free motion quilting foot because there is ALOT of movement when making these loops. And even though it may look complicated, this design is really about one shape and echoing it repeatedly. The most dofficult part is getting the shape that you want, but I find after making just a few your hands get into the rhythm and the ribbon folds look great!
Things to remember when making this curvy design:
Practice on paper first.
If possible, make a few on a practice area or off to the side of actual quilt project to get your hands in the rhythm.
Stitch at a medium speed for smoother curves,
Lengthen your stitch since it's free motion and you are controlling the speed,
Use matching thread to help blend the stitches into your quilt block. (In the photo below I am using white thread - look between the green and blue stripes. I had to amp up the contrast so you could see the texture as I zoomed in.)

How to Make a Ribbon Candy
While thinking of helpful tips I came up with something new, so we will start there.
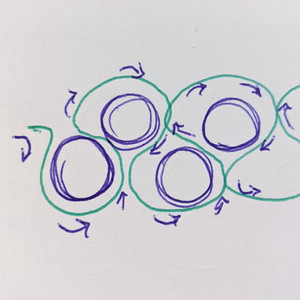
1 - To work on getting that rounded shape, draw some circles that are staggered top and bottom as shown. Then draw around and between the circles as shown in green. (Flashback to running around the cones in gym.)


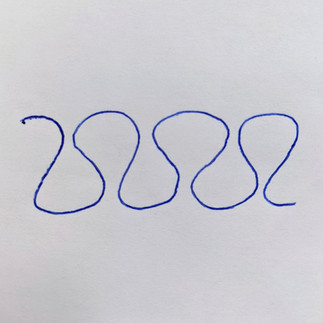
2 - Now try it without the circles. Work on getting a rounded shape and that kiss spot to be centered between the loops. Notice the kiss spot is not in the vertical center of the design (pic 2).


3 - Then give it a go on some fabric! When you start it is like drawing an S and when you finish it kind of looks like squished bubbles LOL.

Here is a little video clip for and extra visual demonstration - I did not speed it up:
You can see that once you get going it really is quick and not too difficult.
And of course there are variations where the loop is more oval, the lines DO cross, or don't kiss, so if that happens you can just say it's supposed to be that way!


Remember only at quilt shows do they judge your quilting - your friends and family will never know the difference. They will just marvel at your talent!
Be a share bear!
I'd love to see your work! You can share photos here in the comments or on facebook or instagram @polkadotpeepquiltsetc or #quiltingribboncandy
I hope you enjoy making ribbon candy with ZERO calories - haha!
Have questions or comments? Please leave them below.
Until next time, have fun stitching.
Be blessed,
Tara


Comments