

Nothing but Love Quilt Along - Besotted
- Tara Wright
- Apr 11, 2022
- 4 min read
Updated: Jul 14, 2022
Happy NEW Block Day! Today we are making Besotted - Block #7 in the Nothing but Love Quilt Along. It is a very straight-forward, traditionally pieced block. It goes together in a snap!

This LOVE-ly version of a churn dash block has a funny story about its name. When I was thinking (and looking up) synonyms for feelings of love I thought of besotted as a word from the 18th and19th century romance novels by Jnae Austen or the Bronte sisters. Imagine my surprise when I looked it up to verify and one of the definitions is drunk and intoxicated! Well I guess sometimes love can be pretty intoxicating - I certainly love this pretty little block!
So let's get to the making my quilty friends...
The Block Pattern

Traditionally a churn dash (also called a Monkey Wrench) has the central framing bars and then half-square triangles in each corner, but you know the hearts have to be somewhere so I traded the HSTs for 4 hearts. We are also using the same heart as the Joyful block (#3), so you are not imagining things.
In the Redwork Garden version I really made the hearts pop with that beautiful red fabric, I went scrappy and put a different print in each corner. I mean why not?!
In my Adel in Spring version there is actually no pink, so I added some Kimberbell and Riley Blake basics. Since the fabric choices are limited there are not quite as many fabrics, but I think I still got all the love. So have fun choosing your fabrics for this one!

And here is the downloadable pattern for Block 7 -Besotted:
If you have any questions or issues with downloading please ask here or on the contact page.
Making the Affection Block - Tips and Tutorial
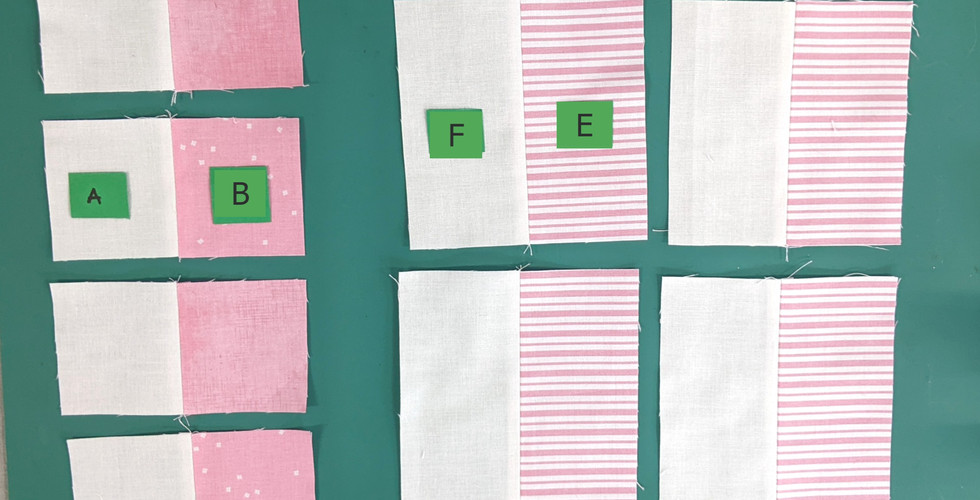
This is a great block for chain piecing! That is sewing the pieces one after the other without breaking thread. It can help with conserving thread and also can keep your pieces from getting sucked into your feed dogs. Since I like to maximize this method I sewed all the A/B pieces together and then all the E/F pieces. Then I cut only the A/B sets away, pressed them, and then sewed the C piece on the end of my chain. So you make all the "9 patch" blocks in one quick chain!
(Hit the little slideshow arrows to see all the pictures of this process)


Then press your 4 hearts and 4 bars and get ready to finish this block in record time!
I don't think I have reviewed my specific process for laying out all quilt blocks and rows, so I thought I would do that today. I have learned that if you create a repetitive process, it helps reduce confusion and errors in case some crazy thing happens amidst your creation - i.e. dropping your blocks, sewing while tired, or interruptions form children/husband/furbaby.
#1 - I try to always lay out my block (and rows) out on the table or bed, and then take a picture with my phone.


#2 - Then I flip my second block over onto my first block, so that I will sew my seam on the right. And then I continue that with each pair of blocks in the row. If there is an odd one out, I let it sit there until I come back with my pair sewn together.

Then I sew the pairs together in the same way and add the oddball onto the end of its pair or row. (Several of my free patterns and my Lovelight quilt get sewn together in rows, so that's why I am mentioning that.)
**You could reverse this if you are left-handed and sew your seams on the left.
#3 - Last press your seams for the finished row before putting the rows together. I think it is easier to manage the fabric this way.

I also wanted to give you a little tip and visual on matching seams with them being pressed open. This only happens in 2 places and it won't really matter visually because the long side of the heart butts against the center bar, but use this for future reference and to keep your junctions nice.
Put your right sides together, and then stick a pin directly into the seam of both pieces. (You do have to open it a little to do this.) and then make the pin stand up perfectly straight (not tilted), hold your fabrics in that position and then push your pin directly in the seams again to anchor in place.


Don't forget that it is so much more fun when you share your progress on the blog, Instagram, or Facebook. Don't forget to use the hashtags #nothingbutloveQAL #besottedblock or tag me @polkadotpeepquiltsetc on either social media platform.
There are link buttons to my Instagram and Facebook on this website.
You can also sign up and join my flock here on Wix (or the Wix Spaces app) to be notified for every new post.
Next week is a new quilting motif lesson, and I will be discussing and demonstrating the WISHBONE design. YAY!
Here is the quilt along schedule (with links for you to catch up anytime):
Nothing but Love Schedule
December 20, 2021 - Quilt Along Intro & Details
January 10, 2022 – Get Ready: Prep the Fabrics & Batting
January 17 – Affection
January 31 – Refuge
February 14 – Joyful
February 28 – Adoration
March 14 – Devotion
March 28 – Inspiration
April 11 – Besotted
April 25 – Admiration
May 9 – Infatuation
May 23 – Faithful
June 6 – Smitten
June 20 – Cherish
July 4 – Patience
July 18 – Comfort
August 1 – Grateful
August 15 –Hopeful
August 29 – Enamored
September 12 - Sashing It All Together & Finishing Details
**Each “between block” Monday there will be a post for quilting the blocks:
January 24, February 7 & 21, March 7 & 21, April 4 & 18, May 2 & 16 & 30, June 13 & 27, July 11 & 25, August 8 & 22, September 5
Have fun making your blocks - I can't wait to see!
With much love, be blessed my friends,
Tara


Comments