Quilting Motif 7 - Wishbones
- Tara Wright
- Apr 18, 2022
- 5 min read
Hi friends! Are you ready to up your quilting skills again? Today we are going to learn a great design for texture in geometric areas - the WISHBONE.

Now I know what you are thinking...I can NOT do that. But I'm here to tell you - YES you can!! Like any process skill, you can learn it by following the process steps and by practicing.
And please realize that I quilt my sample block in a way to show off the motif and many of the possible ways it can be used...eventually. I am also using a more colorful thread and quilting in more obvious areas of the block than I normally would because it's a showpiece.
Nobody (and definitely not me) ever started with varying heights, widths, and shapes of this motif in bright colorful threads in the negative space of a block.
The wishbone simply starts out as a straight line of loops that are made in a specific way to give the wishbone shape. It is great in strips and boxy areas. And I will show you ways that you can make it look fabulous even on your first project.

Speaking of first projects, this is one of the first quilts I made with this design. I was very concerned about the size of the loops all being the same and that the place where the lines cross should all be similar - SO much pressure I put on myself. What I have learned since then is that does NOT matter at all!
So keep this in mind if you are a newbie quilter - have fun, no pressure, and you can only get BETTER!!
If you are new to quilting (or you need a refresher), remember I wrote an intro post that you can read to get your machine, thread, and blocks ready for quilting, just click on the link below:

Wishbone Prep
To get comfortable with making this free-motion quilt design, my first tip is to draw it on paper...repeatedly. Draw it with big loops, draw it with small loops, draw it wide and triangular, draw it narrow and skinny, draw it every way you can think up.
Draw it until you like the way it looks and you feel like you are drawing it pretty smoothly. This will get your hands used to this motion and make it easier to quilt.

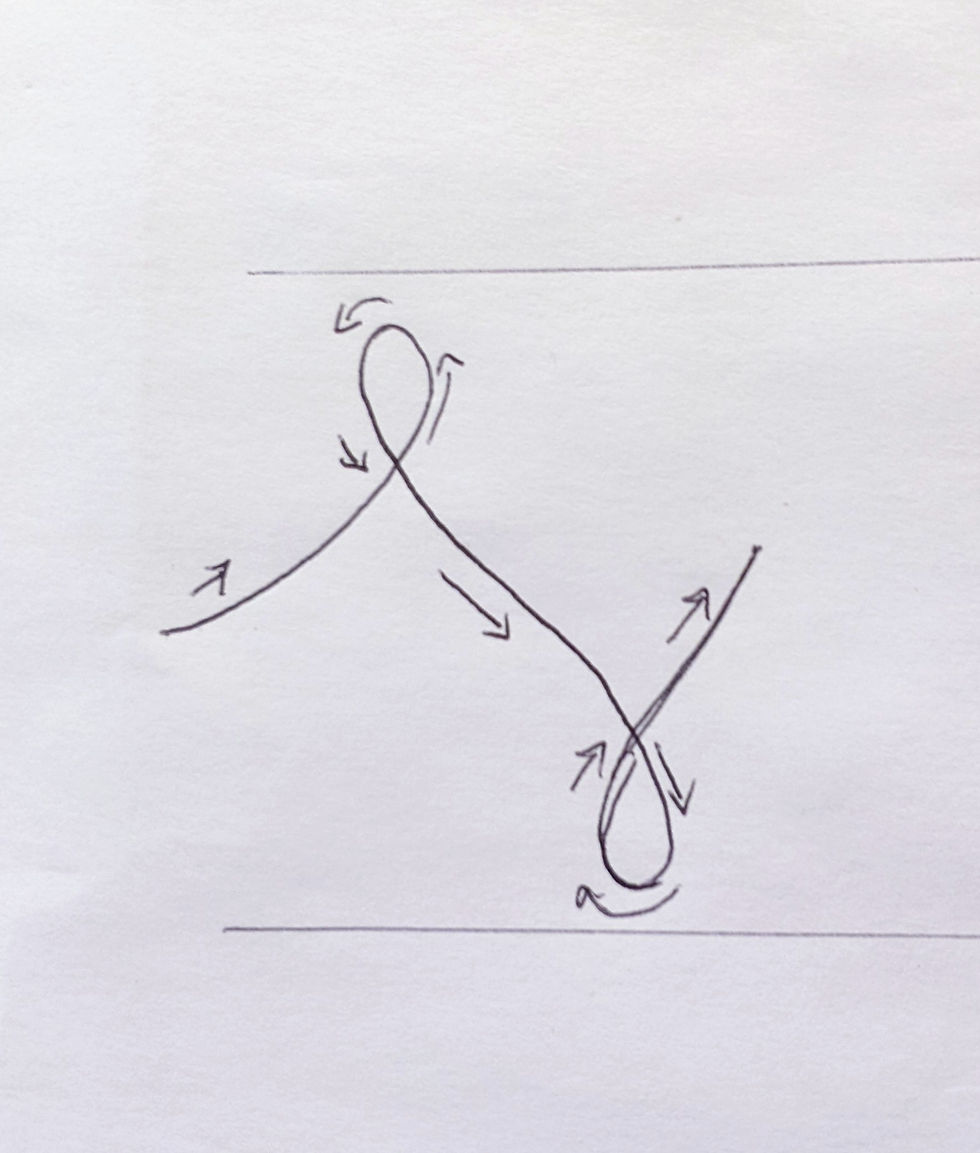
Here is a drawing showing you the actual structure of the wishbone:
start mid-height then slowly curve up to the right then make your loop going around to the left and then cross over and curve downward to the right. Once near the bottom make your loop going to the left again and then cross your line while you head back up and to the right. (Reverse for lefties.)
Placement Decisions
As I mentioned above and you can see as you draw this motif is linear, so it can go in strips or you can fit it into shapes. So it can highlight an area or it can be an allover texture. Also the wishbone is going to be a denser quilting design than most of our previous designs.
In my sample block, do you notice the quilting or the block first? For me, it's the quilting which Is why I usually don't quilt in this way - I want the focus to be on the blocks. So what options are there for you to use this motif on this block that are less "in your face"?
Suggestion 1 - Use the same color thread as the fabric. This will make a huge difference!
Suggestion 2 - Use a bigger, wider version in a bigger, allover space like the entire row of blocks. Since there is a seam line midway through it gives a great guideline for the placement of your wishbone loops.

Suggestion 3 - Use it on a different block than the Besotted block. It is a great motif for borders too!
Now let me show you how I decided on the style and placement of my wishbones.

You might say I totally cheated! I drew my wishbones right on the block with my Frixion marker. And if I didn't like it, I ironed it away and re-drew. You see I made notes to myself to make the "bar area" wishbones more triangular in shape, but skinny in the corners. I even drew in the straight echo lines that I stitched with my walking foot. (You can also use a water-soluble marker.)

Now this little tip is what makes me confidently say that you can stitch wishbones very nicely on your first try - because when you stitch just go right over the ones you drew in place! Even though you won't get them right on the lines it will definitely help with your shapes and spacing.
Just in case you don't believe me, here are a few renditions that I didn't choose:
Once you have decided on your placement (and hopefully drawn it right onto your block) then it's time to quilt.
Let's get stitching!
We have done several free motion designs thus far, so remember to change your foot out to your favorite for free-motion, lower your feed dogs, and increase your spacing length as much as possible. Choose a starting point and put your needle down manually. Put your hands in a nice frame and hold your fabric taut and start to stitch slowly.
In this first video I am showing you the "bar area" and how I start off the block and stitch in the ditch to get to my starting point mid-height. I start slowly, but increase my speed because I think it helps to keep your lines smooth and (not wobbly) if you go a little faster. *This video is in real time, so it really does go quickly.
In this second video, you can see how I stitched the corner blocks. This is a little tricky and you DO need to baste your quilt well to keep your fabric from moving around as you stitch - especially the edge.
When you're done stitching iron or mist your lines away and admire your stitching!
If you are just joining in, here are the links to all the quilting designs we've covered so far in the Nothing but Love Quilt Along:
Intro to Quilting Quilting Basics - Get Ready to Stitch (polkadotpeep.com)
January 24 – Affection/GRIDS Quilting Motif 1 - Grids (polkadotpeep.com)
February 7 – Refuge/OUTLINING Quilting Motif 2 - Outlines (polkadotpeep.com)
February 21 – Joyful/SQUIGGLES Quilting Motif 3 - Squiggles (polkadotpeep.com)
March 7 – Adoration/LOOPS Quilting Motif 4 - Loops (polkadotpeep.com)
March 21 – Devotion/PUMPKIN SEEDS Quilting Motif 5 - Pumpkin Seeds (polkadotpeep.com)
April 4 – Inspiration/WAVY LINES Quilting Motif #6 - Wavy Lines (polkadotpeep.com)
I hope you had fun and don't forget to share your progress and quilt pictures here or on social media with any of these tags #nothingbutloveqal #quiltingwishbones or tag me @polkadotpeepquiltsetc on Facebook or Instagram.
Have questions or comments? Please leave them below.
Until next time, have fun stitching and see you next week for a new block!
Be blessed,
Tara


Comments