

Lovelight Quilt Along - Adding Borders and Finishing Details
- Tara Wright
- Feb 12, 2021
- 2 min read
Hi friends! I hope you've been having fun turning your half-square triangles (HSTs) into a quilt top. Are you surprised at how quickly it went together?
Update on my Lovelight Quilt

My current version has been really fun - I just LOVE these MODA fabrics from Bonnie & Camille! I am really pleased with how doing the "stack & whack" or cut-then-sew version of the 4-at-a-time method really made nice blocks that were ALL usable. I had a little trouble deciding on my layout after I decided to make some different options LOL! Did you cast a vote?


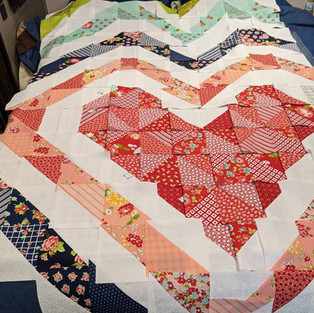


When I made my rows this time, I let all my HST seams stay as they were -instead of trying to nest them - and then pressed each row in alternating directions. As I sewed the rows together, I nested the seams and then pressed the finished horizontal seams OPEN.

And happily almost all of my points and junctions are perfect. The main worry is that the rows stay in line - and they did! The few points that are a tad bit off are within the heart, so you'll never see them with all those glorious patterns!
The Last Step for Throw/Twin - Adding Borders
The measurements are given for adding the borders to each size, however it is a good rule to always measure your quilt top to make sure there isn't any variance.
I add the top and bottom borders first and then the sides. When I join two pieces I press the seams open and they virtually disappear. However this time I am using different prints, and so I am going to miter the joint (like making binding) because i like the look of one pattern flowing into the next.
One final press and your done - WOOHOO!

Finishing Touches
So all that's left now is the transformation from "flimsy" or finished quilt top to finished USABLE quilt! I've collected some helpful links or check out my boards on Pinterest. I also posted some tips on my previous My Cup Runneth Over quilt along: Quilty Finish Line - Tips & Ideas (polkadotpeep.com)
What does that look like:
Make a quilt sandwich
Baste it
Quilt it - take to a longarm professional, practice your FMQ, do some fun walking foot quilting. You can do an allover pattern, row by row pattern or a vortex stile with your heart as the center - SEW many options!


Square up your quilt
Bind it
Label

That's a Wrap!
I hope you enjoyed these tips on making the Lovelight Quilt with me and I can't wait to see your finished versions - remember tag me @polkadotpeepquiltsetc on Facebook or Instagram and use #LovelightQuilt
Prize drawings on Feb. 14, March 7, and April 11 for any progress pictures that are tagged on social media or posted here.
Happy Sewing & Be Blessed!
Tara


Comments