

Quilting Motif 8 - Fractured Spiral
- Tara Wright
- May 2, 2022
- 4 min read
Updated: Feb 14
It's time for another fun quilting design my friends! Today we are using our walking foot to make this interesting swirling design. I call it fractured spiral because it reminds me of icy puddles or broken glass. I love the way it draws your focus to the center and it's sooo easy to do!

This quilting design is straightforward and uncomplicated in its structure, and I think you will be surprised at the unique look it creates. It is great for drawing your eye to the center of the block or a medallion-style quilt (because you could use it for a whole quilt top). It is made with straight lines only which is why I use my walking foot. The fractured spiral would also add great texture to simple patchwork or be a fun addition to a thread-play project. And it plays well with other designs - on the quilt below, I mixed it with straight lines and grids.

There is one negative issue that can occur when creating this design - puckering. It is bound to happen sometime, but I will give you some tips to hopefully prevent it.
So let's get quilting!
Good Prep Prevents Puckering
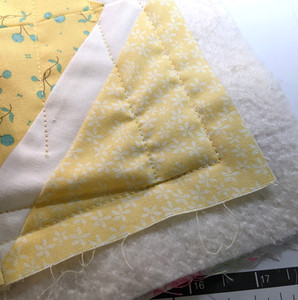
The main issue that I have when creating this straight-line spiral is puckering or bunching of the fabric. There are 2 causes: sewing from the outside in towards the center and not basting properly. I haven't figured a way to make this design starting from the center, so only one of these can be fixed. On this block I tried to use only sparse pinning as my basting method, but it wasn't good enough. Here's what happened (sad face):


To correct this - baste well - use spray baste, alot of pins, basting stitches, or a combination of these. Start from the center and work your way out smoothing the fabric as you go. And definitely baste at the outer edge of your block or quilt. If you should get puckering that you can not work out, it's ok. Stop stitching and "un-stitch" with your favorite seam ripper, but only the sections that are in the affected area.
When you start stitching again, you will need to start a few stitches from the previous stopping point, sew over the original stitches, reverse/lock stitch a few stitches, and then continue on with the spiral motif. If you have to fix a section that was in the middle of a spiral then lock your ending stiches when you meet back up with the original stitches as well (stop). The photo below shows my "repair" area which included the two outermost lines in that corner.

Let's Go Round and Round

To make this design, start sewing in a corner and make a complete square around the edge of your block. I recommend at least 1/2" away from the edge since 1/4" is your seam allowance, but you could make it up to 1" away if you like.

When you get to the connecting corner, with your needle down, pivot to make your next straight line so that it ends an inch or more to the inside of the original corner.
Each time you run into your previous stitch line, you will repeat this process. You're always making a four-sided shape with your diagonal lines that will be square-ish, but does not have to be perfectly measured out.
You repeat this process with your spacing as tight as you like, and then stop when you feel like you're done (or the area is too small). I always finish with a triangle in the center for some reason - I like the way it looks. You can do this too or not, it's up to you. Here is a photo montage to let you see the whole process:


Pretty cool right?! When you finish your center shape, just reverse stitch a few times and then forward stitch 1-2 times to lock your stitches.
Here is a video (at 1.5x speed) to help you see the process a little bit:
I'd love to see your quilting! Share your pictures and progress here or on social media with #nothingbutloveqal #quiltingfracturedspirals or tag me @polkadotpeepquiltsetc on Instagram or Facebook.
If you are new to quilting, I wrote an intro post that you can read to get your blocks set up and machine ready. And if you are just finding this series then you can see all of the other designs, just click on the links below:
Intro to Quilting Quilting Basics - Get Ready to Stitch (polkadotpeep.com)
January 24 – Affection/GRIDS Quilting Motif 1 - Grids (polkadotpeep.com)
February 7 – Refuge/OUTLINING Quilting Motif 2 - Outlines (polkadotpeep.com)
February 21 – Joyful/SQUIGGLES Quilting Motif 3 - Squiggles (polkadotpeep.com)
March 7 – Adoration/LOOPS Quilting Motif 4 - Loops (polkadotpeep.com)
March 21 – Devotion/PUMPKIN SEEDS Quilting Motif 5 - Pumpkin Seeds (polkadotpeep.com)
April 4 – Inspiration/WAVY LINES Quilting Motif #6 - Wavy Lines (polkadotpeep.com)
April 18 – Besotted/WISHBONE Quilting Motif 7 - Wishbones (polkadotpeep.com)
If you want to be notified of each new lesson/post hit the log in button and sign up.
Next week will be Block #9 - Infatuation - I can't believe it!
Be blessed,
Tara


Comments