

Quilting Motif 12 - Oyster Shells
- Tara Wright
- Jun 28, 2022
- 6 min read
I have something SO fun for you today! Today we are going to learn a design that creates fabulous texture in any quilted area - the OYSTER SHELL.

This quilting design is one of my favorite fillers! It is a "filler" because it is very busy or dense pattern - there are no spaces between the shapes similar to the pebbles we did last week. You can make it less dense by making your initial shapes bigger and then having more space between each echo.
I would suggest that if you want to use it in large spaces or as an allover pattern. I have used it as an allover pattern, but only for small projects like bags or table toppers. Oyster shells are fun to mix in with other motifs for a graffiti-style combination of patterns if you like that style.


This is a design that uses your free motion quilting foot because there is ALOT of movement when making these little shells. And even though it may look complicated, this design is really about one shape and echoing it repeatedly.
Things to remember when making this curvy design:
Stitch at a medium speed for smoother curves,
Lengthen your stitch since it's free motion and you are controlling the speed,
Use matching thread to help blend the stitches into your quilt block. (In the photo below I am using rainbow variegated thread. You can see when the thread is yellow and white you barely see it in comparison to the blue and red sections.)

Machine/Tool Maintenance

Since we have done several FMQ (free-motion quilting) designs recently, I wanted to mention that if you use a "slider" on your machine deck it may appreciate a quick cleaning.
Check your product's guide, but mine is easy to clean with a quick wipe with some alcohol on a cotton pad/puff. It was super dirty (don't judge) and now it is REALLY sticky!
I would also suggest removing the needle plate (between your foot and bobbin) and cleaning the lint out of your machine. Check your machine manual on how to do that as well.
Typically it is involves removing a few screws and your bobbin case. Things I use to nab all the fluff include my little lint brush, cotton swabs, and canned spray air.
How Do You Make an Oyster Shell?
Now that your machine is sparkly clean, your feed dogs are down, and you have your free-motion foot on, it's time to stitch! Make sure your block/quilt is basted well.

I usually start this design in the center or corner of the designated area to be quilted, so you can either start there and leave long tails to tie off or travel there by stitching in the ditch or stitching design of your choice.

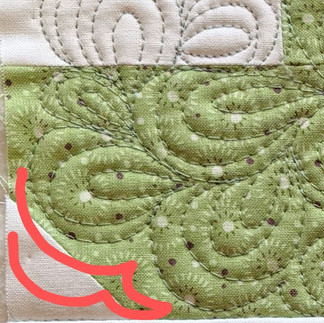
When you are ready to start your shell, you simply make a stretched out teardrop shape in the direction you want to fill up. You start and end in the same spot, and it's pointy on one end and rounded on the other.
Then you simply go back the way you came and echo the teardrop. To make it shell-like your echo line is closer to the pointy end and further away going around the curve. When you complete the second teardrop, reverse and make a third echo line.
Here is a little video clip to demonstrate:
You can see that your lines don't necessarily have to come all the way back together at the point. Once you get several shells made this becomes necessary because you are bumping into the other shells, so you just stop your echo line when you hit the adjoining shell. Try NOT to cross lines much as this will detract from your shell shapes.

If you would like to add a little flair to your shells you can turn them into paisleys by making your initial shape be a curvy teardrop (paisley). Then echo in the same way.
Once you go around your teardrop 3-4 times then start another shape. It helps the randomness of the pattern if you start your next shape somewhere along the previous shape but not exactly at the end point. If they all start at the end point, it will look like a flower. Also make your next teardrop point away from the previous shape like 45 to 90 degrees. This will give you space for your echo lines, randomize the direction of your shells, and fill in your space nicely.
Here is a short video so you can see this process in action. (It is in double-time, but it only took 5 minutes in real time.) You can also see how I framed my quilting area with a little stitch-in-the-ditch and traveled form the edge of my block to the center to start.
I originally stopped when I filled in the heart shape, but changed my mind and filled in the entire quadrant. I know the video is a little quick, but I hope when you look at the pictures you can see the structure of the shells better. And yes, sometimes I did not reverse directions to make my echo lines. On occasion when I got to the point, I basically circled around to make the echo line. Those decisions and a few others are made based on travelling around the area I want to fill. More on that coming up next...

Tips on Filling Spaces and Travelling
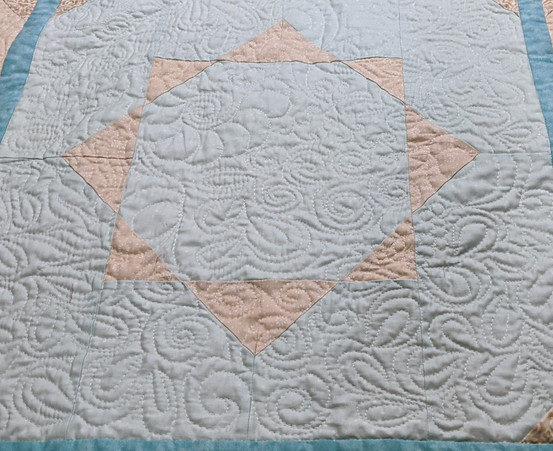
When you are quilting you want to evenly fill up your area - whether that is an entire quilt or a section of a block. With the Cherish block, I framed each quadrant with a straight line by stitching along the center sashing seams as shown in the video. This defined my area to fill. The trick is then to stay within that framed area. Sometimes you get busy making shells and you run out of space and/or you are far from a clear area - then what do you do? Most of the time I prefer not to break thread to fix these issues. There are easy solutions to these problems!
Problem 1: Run out of space for a complete oyster shell, but the space is not evenly filled. An unquilted area will be more noticeable than if it's quilted differently.
Solution - Make an additional echo line for all adjacent shells or I make little "hills" off of one shell that I echo back and forth until I fill that little blank spot.
In this example, I forgot to quilt the corner out in this quadrant. I have drawn in possible solutions.


Problem 2: I am filled up on one side of my block and at a stopping point, but there is empty space on the other side of the block.
Solution: Travel over to the other side by making outer echo lines on all the shells in between where you are and where you want to be.
In this video example, I show how to bounce along the tops of all the shells to get to the other side.
Problem 3: Making the oyster shells fit into your space. As you are stitching you will notice that your space is bigger or smaller than you need for the "typical" oyster shell you are making.
Solution: There is no quilting police! So make your shells large or small, make 2 echo lines or 5 echo lines, or don't have a center shape just little filler hills - the goal is to evenly fill your space with similar lines and similar spacing.
You can see this philosophy in action by looking at the back of my completed quilt block. And you can see I chose to fill in the center sqaure with some pebbles (which are very tiny).

Congratulations on another beautiful finish!
Be a share bear!
I'd love to see your work whether it is on this quilt along or you're using this design on another project! You can share photos here in the comments or on facebook or instagram @polkadotpeepquiltsetc or #quiltingoystershells or #nothingbutloveQAL or email me and I will share it at polkadotpeep@yahoo.com

If you are just joining in, here are the links to all the quilting designs we've covered so far in the Nothing but Love Quilt Along:
Intro to Quilting Quilting Basics - Get Ready to Stitch (polkadotpeep.com)
January 24 – Affection/GRIDS Quilting Motif 1 - Grids (polkadotpeep.com)
February 7 – Refuge/OUTLINING Quilting Motif 2 - Outlines (polkadotpeep.com)
February 21 – Joyful/SQUIGGLES Quilting Motif 3 - Squiggles (polkadotpeep.com)
March 7 – Adoration/LOOPS Quilting Motif 4 - Loops (polkadotpeep.com)
March 21 – Devotion/PUMPKIN SEEDS Quilting Motif 5 - Pumpkin Seeds (polkadotpeep.com)
April 4 – Inspiration/WAVY LINES Quilting Motif #6 - Wavy Lines (polkadotpeep.com)
April 18 – Besotted/WISHBONE Quilting Motif 7 - Wishbones (polkadotpeep.com)
May 2 – Admiration/FRACTURED SPIRAL Quilting Motif 8 - Fractured Spiral (polkadotpeep.com)
May 16 – Infatuation/SCALLOPS Quilting Motif 9 - Scallops (polkadotpeep.com)
May 30 – Faithful/ PEBBLES Quilting Motif 10 - Pebbles (polkadotpeep.com)
June 13 – Smitten/LG WF SPIRAL Quilting Motif 11 - Spiral (polkadotpeep.com)
I hope you enjoyed making oyster shells with me - SO FUN right?!
Have questions or comments? Please leave them below.
Until next time, have fun stitching and see you next week for a new block!
Be blessed,
Tara


Comments